http://melonicedlatte.com/2018/04/07/032920.html 링크에서 기본적인 세팅을 하고 오시면 됩니다!!
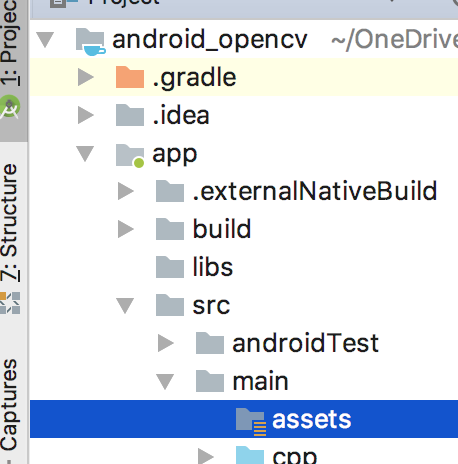
1. src/main 에 assets 폴더가 없으면 추가시켜줍니다. 변경할 이미지를 아래와 같이 넣어줍니다.
(움직이는 gif 는 테스트해보니 작동하지 않습니다!! )

<uses-permission android:name="android.permission.WRITE_EXTERNAL_STORAGE" />
2. 위의 permission을 Androidmanifest.xml 에 추가해줍니다. 방향 관련 소스코드는 제거합니다.
xml version="1.0" encoding="utf-8"?>
<manifest xmlns:android="http://schemas.android.com/apk/res/android"
    package="com.opencv.gohn.android_opencv">


    <uses-permission android:name="android.permission.CAMERA"/>
    <uses-feature android:name="android.hardware.camera" android:required="false"/>
    <uses-feature android:name="android.hardware.camera.autofocus" android:required="false"/>
    <uses-feature android:name="android.hardware.camera.front" android:required="false"/>
    <uses-feature android:name="android.hardware.camera.front.autofocus"  android:required="false"/>
    <uses-permission android:name="android.permission.WRITE_EXTERNAL_STORAGE" />

    <supports-screens android:resizeable="true"
        android:smallScreens="true"
        android:normalScreens="true"
        android:largeScreens="true"
        android:anyDensity="true" />


    <application
        android:allowBackup="true"
        android:icon="@mipmap/ic_launcher"
        android:label="@string/app_name"
        android:roundIcon="@mipmap/ic_launcher_round"
        android:supportsRtl="true"
        android:theme="@style/AppTheme">
        <activity android:name=".MainActivity"
            android:screenOrientation="portrait"      < 삭제 >
            android:configChanges="keyboardHidden|orientation"
            >
            <intent-filter>
                <action android:name="android.intent.action.MAIN" />

                <category android:name="android.intent.category.LAUNCHER" />
            intent-filter>
        activity>
    application>

manifest>
# For more information about using CMake with Android Studio, read the
# documentation: https://d.android.com/studio/projects/add-native-code.html
# Sets the minimum version of CMake required to build the native library.
cmake_minimum_required(VERSION 3.4.1)
set(pathOPENCV /Users/imjaegon/programming/OpenCV-android-sdk)
set(pathPROJECT /Users/imjaegon/OneDrive/Documents/android/android_opencv)
set(pathLIBOPENCV_JAVA ${pathPROJECT}/app/src/main/JniLibs/${ANDROID_ABI}/libopencv_java3.so)
set(CMAKE_VERBOSE_MAKEFILE on)
set(CMAKE_CXX_FLAGS "${CMAKE_CXX_FLAGS} -std=gnu++11")
include_directories(${pathOPENCV}/sdk/native/jni/include)
# Creates and names a library, sets it as either STATIC
# or SHARED, and provides the relative paths to its source code.
# You can define multiple libraries, and CMake builds them for you.
# Gradle automatically packages shared libraries with your APK.
add_library( # Sets the name of the library.
native-lib
# Sets the library as a shared library.
SHARED
# Provides a relative path to your source file(s).
src/main/cpp/native-lib.cpp )
# Searches for a specified prebuilt library and stores the path as a
# variable. Because CMake includes system libraries in the search path by
# default, you only need to specify the name of the public NDK library
# you want to add. CMake verifies that the library exists before
# completing its build.
add_library( lib_opencv SHARED IMPORTED )
set_target_properties(lib_opencv PROPERTIES IMPORTED_LOCATION ${pathLIBOPENCV_JAVA})
find_library( # Sets the name of the path variable.
log-lib
# Specifies the name of the NDK library that
# you want CMake to locate.
log )
find_library( android-lib android)
# Specifies libraries CMake should link to your target library. You
# can link multiple libraries, such as libraries you define in this
# build script, prebuilt third-party libraries, or system libraries.
target_link_libraries( # Specifies the target library.
native-lib
lib_opencv
# Links the target library to the log library
# included in the NDK.
${log-lib}
${android-lib}
)
3. app/CMakeLists.txt 파일에서 분홍색으로 표시된 부분을 추가합니다.
xml version="1.0" encoding="utf-8"?>
<LinearLayout xmlns:android="http://schemas.android.com/apk/res/android"
    xmlns:app="http://schemas.android.com/apk/res-auto"
    xmlns:tools="http://schemas.android.com/tools"
    android:layout_width="match_parent"
    android:layout_height="match_parent"
    android:orientation="vertical"
    tools:context=".MainActivity">


    <ImageView
        android:layout_width="match_parent"
        android:layout_height="0dp"
        android:layout_weight="1"
        android:id="@+id/imageViewInput"
        />

    <ImageView
        android:layout_width="match_parent"
        android:layout_height="0dp"
        android:layout_weight="1
        android:id="@+id/imageViewOutput"/>

LinearLayout>
4. activity_main.xml 파일에서 기존에 있던 내용은 주석처리하고 ImageView 를 2개 생성해서 넣습니다.
전체 레이아웃을 LinearLayout으로 변경했습니다.
package com.opencv.gohn.android_opencv;

import android.content.DialogInterface;
import android.content.pm.PackageManager;
import android.content.res.AssetManager;
import android.graphics.Bitmap;
import android.os.Build;
import android.os.Environment;
import android.support.v7.app.AlertDialog;
import android.support.v7.app.AppCompatActivity;
import android.os.Bundle;
import android.util.Log;
import android.widget.ImageView;

import org.opencv.android.Utils;
import org.opencv.core.Mat;

import java.io.File;
import java.io.FileOutputStream;
import java.io.InputStream;
import java.io.OutputStream;

public class MainActivity extends AppCompatActivity{

    static {
        System.loadLibrary("opencv_java3");
        System.loadLibrary("native-lib");
    }

    ImageView imageVIewInput;
    ImageView imageVIewOuput;
    private Mat img_input;
    private Mat img_output;

    private static final String TAG = "opencv";
    static final int PERMISSION_REQUEST_CODE = 1;
    String[] PERMISSIONS  = {"android.permission.WRITE_EXTERNAL_STORAGE"};

    private boolean hasPermissions(String[] permissions) {
        int ret = 0;
        //스트링 배열에 있는 퍼미션들의 허가 상태 여부 확인
        for (String perms : permissions){
            ret = checkCallingOrSelfPermission(perms);
            if (!(ret == PackageManager.PERMISSION_GRANTED)){
                //퍼미션 허가 안된 경우
                return false;
            }

        }
        //모든 퍼미션이 허가된 경우
        return true;
    }

    private void requestNecessaryPermissions(String[] permissions) {
        //마시멜로( API 23 )이상에서 런타임 퍼미션(Runtime Permission) 요청
        if (Build.VERSION.SDK_INT >= Build.VERSION_CODES.M) {
            requestPermissions(permissions, PERMISSION_REQUEST_CODE);
        }
    }

    private void copyFile(String filename) {
        String baseDir = Environment.getExternalStorageDirectory().getPath();
        String pathDir = baseDir + File.separator + filename;

        AssetManager assetManager = this.getAssets();

        InputStream inputStream = null;
        OutputStream outputStream = null;

        try {
            Log.d( TAG, "copyFile :: 다음 경로로 파일복사 "+ pathDir);
            inputStream = assetManager.open(filename);
            outputStream = new FileOutputStream(pathDir);

            byte[] buffer = new byte[1024];
            int read;
            while ((read = inputStream.read(buffer)) != -1) {
                outputStream.write(buffer, 0, read);
            }
            inputStream.close();
            inputStream = null;
            outputStream.flush();
            outputStream.close();
            outputStream = null;
        } catch (Exception e) {
            Log.d(TAG, "copyFile :: 파일 복사 중 예외 발생 "+e.toString() );
        }

    }

    @Override
    public void onRequestPermissionsResult(int permsRequestCode, String[] permissions, int[] grantResults){
        switch(permsRequestCode){

            case PERMISSION_REQUEST_CODE:
                if (grantResults.length > 0) {
                    boolean writeAccepted = grantResults[1] == PackageManager.PERMISSION_GRANTED;

                    if (Build.VERSION.SDK_INT >= Build.VERSION_CODES.M) {

                        if (!writeAccepted )
                        {
                            showDialogforPermission("앱을 실행하려면 퍼미션을 허가하셔야합니다.");
                            return;
                        }else
                        {
                            read_image_file();
                            imageprocess_and_showResult();
                        }
                    }
                }
                break;
        }
    }

    private void showDialogforPermission(String msg) {

        final AlertDialog.Builder myDialog = new AlertDialog.Builder(  MainActivity.this);
        myDialog.setTitle("알림");
        myDialog.setMessage(msg);
        myDialog.setCancelable(false);
        myDialog.setPositiveButton("예", new DialogInterface.OnClickListener() {
            public void onClick(DialogInterface arg0, int arg1) {
                if (Build.VERSION.SDK_INT >= Build.VERSION_CODES.M) {
                    requestPermissions(PERMISSIONS, PERMISSION_REQUEST_CODE);
                }

            }
        });
        myDialog.setNegativeButton("아니오", new DialogInterface.OnClickListener() {
            public void onClick(DialogInterface arg0, int arg1) {
                finish();
            }
        });
        myDialog.show();
    }

    @Override
    protected void onCreate(Bundle savedInstanceState) {
        super.onCreate(savedInstanceState);
        setContentView(R.layout.activity_main);

        imageVIewInput = (ImageView)findViewById(R.id.imageViewInput);
        imageVIewOuput = (ImageView)findViewById(R.id.imageViewOutput);

        if (!hasPermissions(PERMISSIONS)) { //퍼미션 허가를 했었는지 여부를 확인
            requestNecessaryPermissions(PERMISSIONS);//퍼미션 허가안되어 있다면 사용자에게 요청
        } else {
            //이미 사용자에게 퍼미션 허가를 받음.
            read_image_file();
            imageprocess_and_showResult();
        }
    }

    private void imageprocess_and_showResult() {

        imageprocessing(img_input.getNativeObjAddr(), img_output.getNativeObjAddr());

        Bitmap bitmapInput = Bitmap.createBitmap(img_input.cols(), img_input.rows(), Bitmap.Config.ARGB_8888);
        Utils.matToBitmap(img_input, bitmapInput);
        imageVIewInput.setImageBitmap(bitmapInput);

        Bitmap bitmapOutput = Bitmap.createBitmap(img_output.cols(), img_output.rows(), Bitmap.Config.ARGB_8888);
        Utils.matToBitmap(img_output, bitmapOutput);
        imageVIewOuput.setImageBitmap(bitmapOutput);
    }

    private void read_image_file() {
        copyFile("IU.jpg");

        img_input = new Mat();
        img_output = new Mat();

        loadImage("IU.jpg", img_input.getNativeObjAddr());
    }


    /**
     * A native method that is implemented by the 'native-lib' native library,
     * which is packaged with this application.
     */
    public native void loadImage(String imageFileName, long img);
    public native void imageprocessing(long inputImage, long outputImage);


}
5. MainActivity.java 파일을 수정해줍니다.
위의 멤버들과 메소드들을 넣어줍니다.

6. 해당 메소드가 없어서 빨간 글자가 뜨게 됩니다.
링크를 클릭해서 메소드를 생성한 다음 native-lib.cpp 내용을 넣어주어야 합니다.
#include#include #include
using namespace cv;
using namespace std;
extern "C"
JNIEXPORT void JNICALL
Java_com_opencv_gohn_android_1opencv_MainActivity_loadImage(JNIEnv *env, jobject instance,
jstring imageFileName_, jlong img) {
const char *imageFileName = env->GetStringUTFChars(imageFileName_, 0);
// TODO
Mat &img_input = *(Mat *) img;
const char *nativeFileNameString = env->GetStringUTFChars(imageFileName_, JNI_FALSE);
string baseDir("/storage/emulated/0/");
baseDir.append(nativeFileNameString);
const char *pathDir = baseDir.c_str();
img_input = imread(pathDir, IMREAD_COLOR);
}
extern "C"
JNIEXPORT void JNICALL
Java_com_opencv_gohn_android_1opencv_MainActivity_imageprocessing(JNIEnv *env, jobject instance,
jlong inputImage,
jlong outputImage) {
// TODO
Mat &img_input = *(Mat *) inputImage;
Mat &img_output = *(Mat *) outputImage;
cvtColor( img_input, img_input, CV_BGR2RGB);
cvtColor( img_input, img_output, CV_RGB2GRAY);
blur( img_output, img_output, Size(5,5) );
Canny( img_output, img_output, 50, 150, 5 );
}
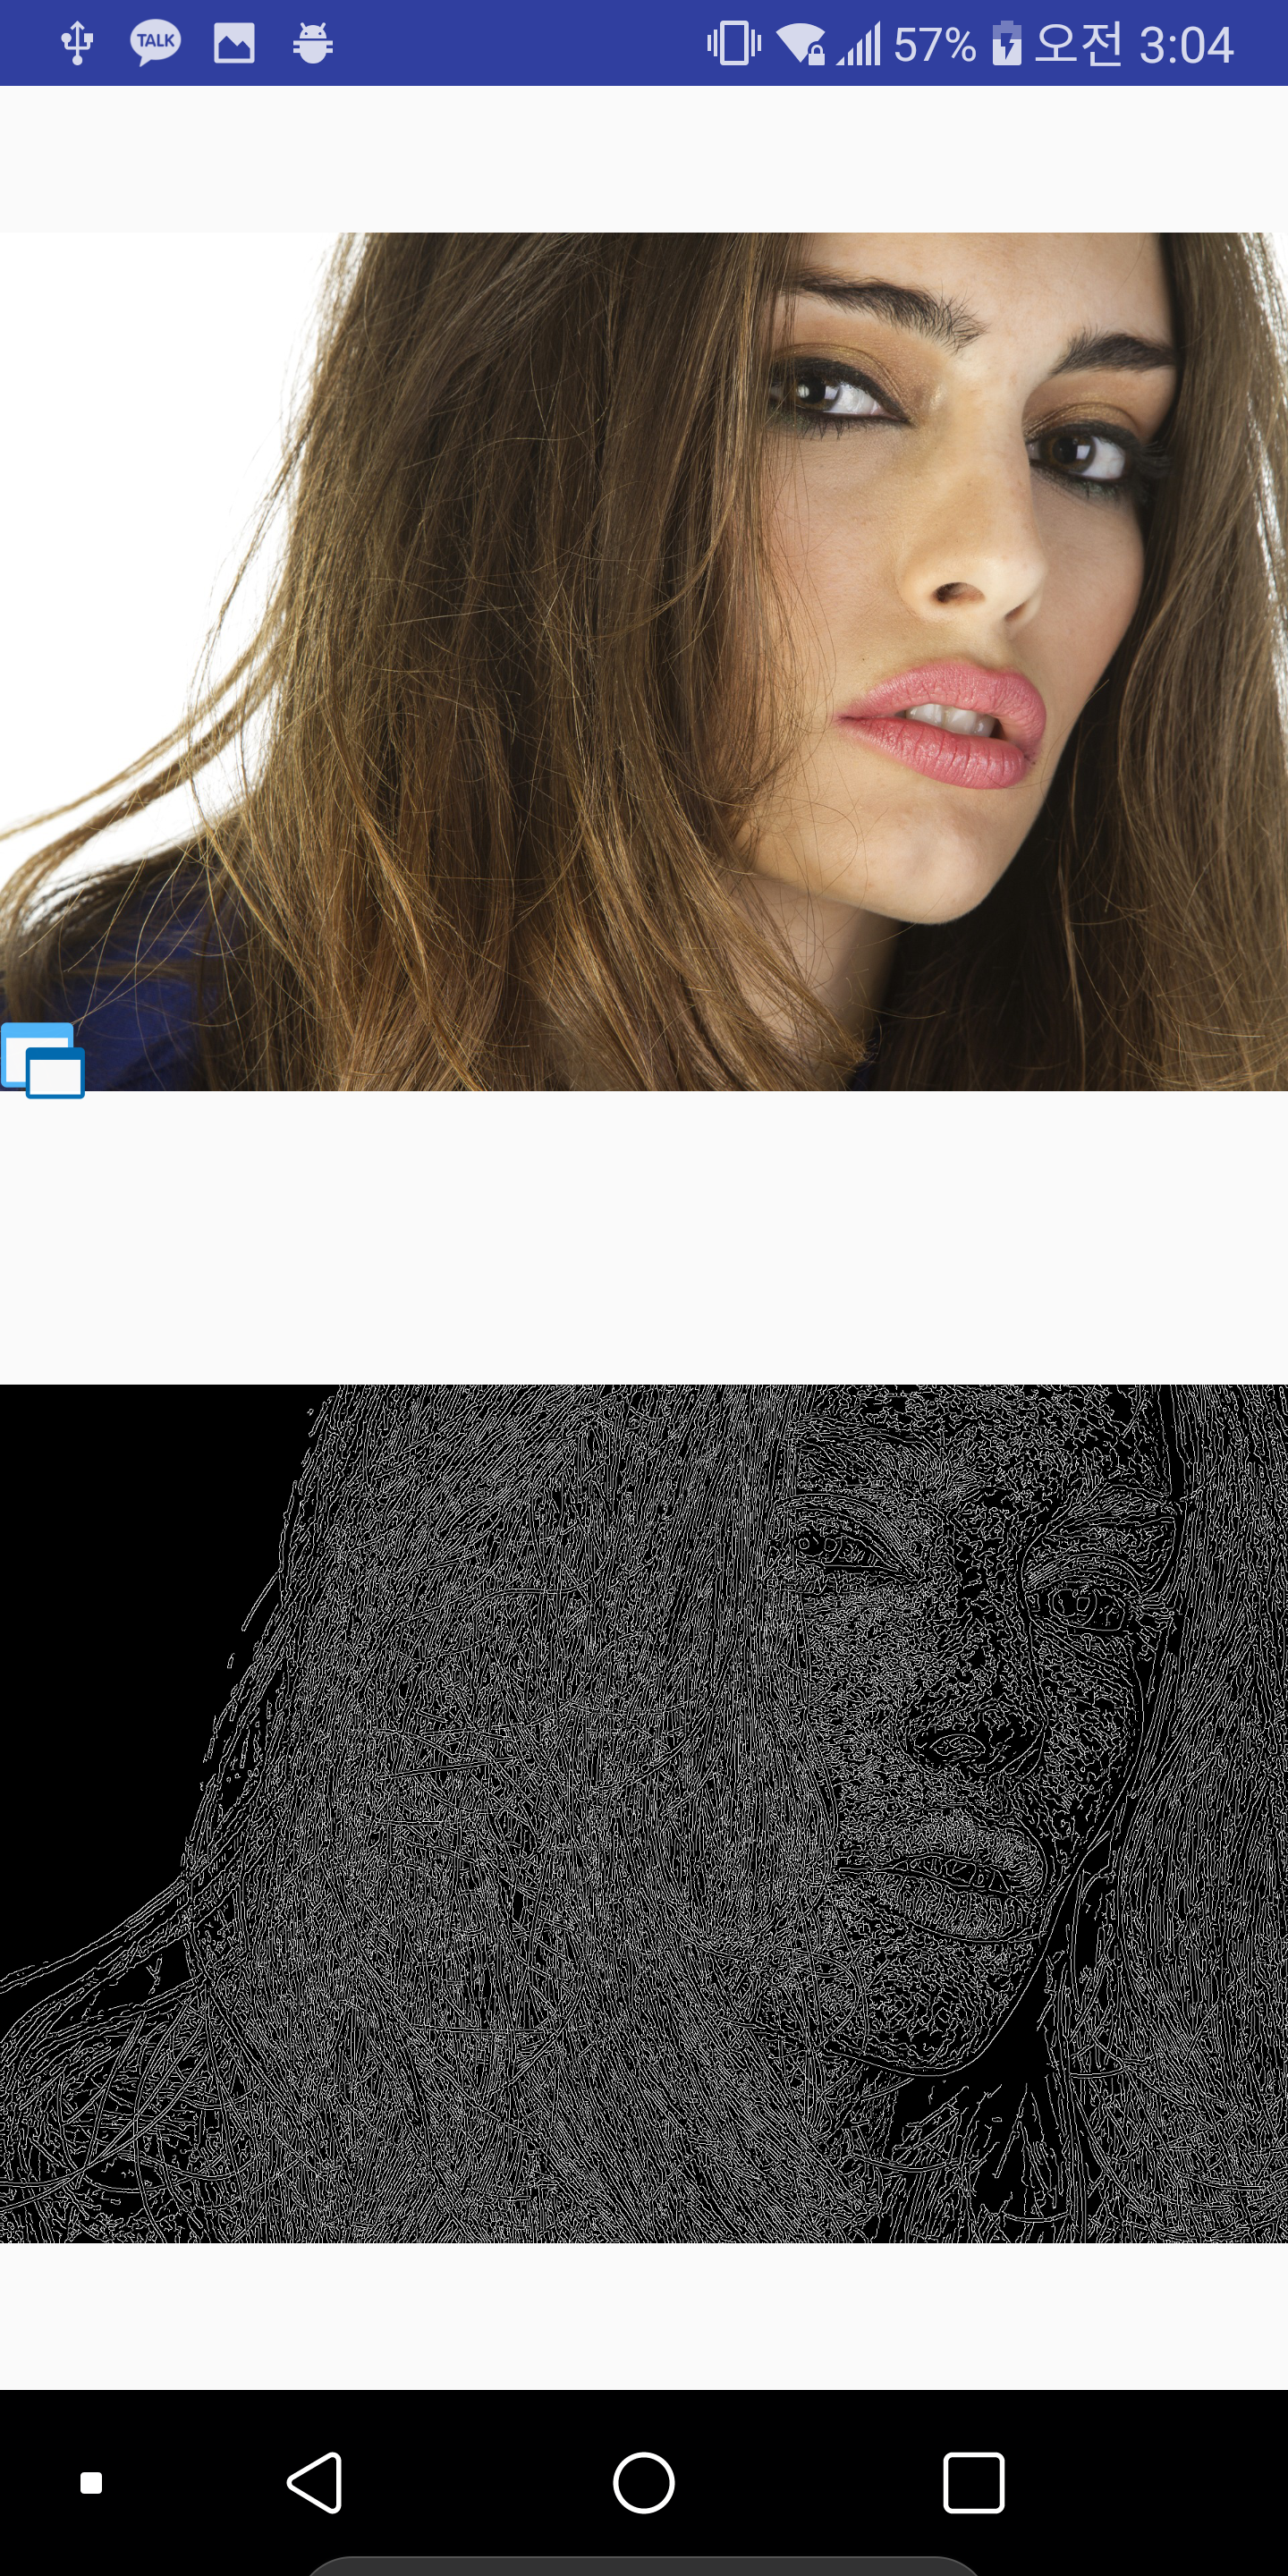
수행 결과 아래와 같이 잘 나타나게 됩니다 !!
- 출처 -
http://webnautes.tistory.com/1090
http://melonicedlatte.com/2018/04/07/032920.html