얼굴인식을 해서 두 개의 얼굴을 바꾸어 주는 사진 앱이 한 동안 인기있었는데요,
사촌형이 컴퓨터과학부를 재학중에 얼굴을 인식해서 컴퓨터 모니터가 켜지는 것을 했던 것도 기억이 나고
새로운 것을 항상 해보고 싶어서 이번에는 OpenCV 를 시도 해 보았습니다.
OpenCV 는 C , C++, Python, Java 언어를 지원 하는 것으로 알고 있는데
저 같은 경우에는 Java 가 가장 친숙하긴 하지만 python 으로 진행하였습니다.
설치하느라 토요일에서 일요일에 엄청난 시간을 할애하게 되었습니다.
설치 과정도 복잡하고 이번에는 엄청 오래걸렸네요
http://www.pyimagesearch.com/2015/07/20/install-opencv-3-0-and-python-3-4-on-ubuntu/
위의 링크를 참조해서 설치를 진행 해 보았습니다.
그 다음에 간단하게 사진을 openCV 로 인식해보았습니다.
제 환경은 Ubuntu 환경에서 설치를 진행하겠습니다.
>> 설치시작
However, one of the huge benefits of migrating to OpenCV 3.0 is the new Python 3.4+ support.
위의 홈페이지에서 설명을 보면 파이썬 3.4 이상도 OpenCV 3.0 은 지원을 한다고 합니다.
UPDATE: The tutorial you are reading now covers how to install OpenCV 3.0 with Python 3.4+ bindings on Ubuntu 14.04. This tutorial still works perfectly, but if you want to install OpenCV on the newer Ubuntu 16.04 with OpenCV 3.1 and Python 3.5+, please use this freshly updated tutorial:
http://www.pyimagesearch.com/2016/10/24/ubuntu-16-04-how-to-install-opencv/
이번에 제가 따라한 설치방법은 Ubuntu 14.04 에서 3.4 버전을 지원한다고 합니다.
만약 OpenCV 를 Ubuntu 16.04 버전에서 설치하려면 위의 링크를 따라가서 설치하라고 합니다.
제가 저 링크 방법으로 설치해보지는 않아서 포스팅은 하지 않겠습니다.
설치할 때는 막 설치했는데, 다음부터는 상세하게 읽어보고 설치해야겠습니다.
Step 1: Install prerequisites
Upgrade any pre-installed packages: apt-get 을 update 해줍니다.
Install developer tools used to compile OpenCV 3.0: developer tools 을 설치해줍니다.
Install libraries and packages used to read various image formats from disk: 다양한 이미지 형태를 읽을 수 있는 라이브러리와 패키지를 다운로드 합니다.
Install a few libraries used to read video formats from disk: 다양한 형태의 비디오를 읽을 수 있는 라이브러리를 설치합니다.
1 | $ sudo apt-get install libavcodec-dev libavformat-dev libswscale-dev libv4l-dev |
Install GTK so we can use OpenCV’s GUI features: OpenCV 의 GUI 를 사용 할 수 있는 GTK 를 설치합니다.
Install packages that are used to optimize various functions inside OpenCV, such as matrix operations:
행렬 연산 같은 OpenCV 안에 있는 다양한 함수를 최적화하는 패키지를 설치합니다.
다음 과정은 Python 을 설치하는 건데 Python 은 설치되어있다고 가정하고 진행하겠습니다.

python -V현재 설치되어 있는 파이썬의 버전은 위의 명령어로 해결 할 수 있습니다.
저 같은 경우에 python3.5 도 로컬에 설치되어있는데, 정확히 어떻게 3.5에 설치를 하는지는 잘 몰라서 자동으로 2.7 에 설치가 되었습니다.
Note that I have specifically indicated python3 when installing pip . If you do not supplypython3 , then Ubuntu will attempt to install pip on your Python 2.7 distribution, which is not our desired intention.
Alright, so I’ve said it before on the PyImageSearch blog, and I’ll see it again. You should really be using virtual environments for Python development!
We’ll be using virtualenv and virtualenvwrapper in this tutorial. These packages allow us to create entirely separate and independent Python environments, ensuring that we don’t junk up our system Python install (and more importantly, so we can have a separate Python environment for each of our projects).
여기서는 virtualenv 와 virtualenvwrapper 를 설치하게 하는데 이 친구들은 분리되고 독립적인 파이썬 환경을 만들 수 있게 해준다고 합니다.
사실 정확한 사용법은 모르지만 설치에 나와있기 때문에 따라 가겠습니다.
Let’s use our fresh pip3 install to setup virtualenv and virtualenvwrapper : pip3 를 통해서 virtualenv와 virtualenvwrapper 을 설치합니다.
Again, notice how I am specifying pip3 instead of just pip — I’m just making it explicitly obvious that these packages should be installed for Python 3.4.
Now we can update our ~/.bashrc file (place at the bottom of the file): ~/.bashrc 파일을 업데이트 해줍니다.
Notice how I am pointing VIRTUALENVWRAPPER_PYTHON to where our Python 3 binary lives on our Ubuntu system.
To make these changes take affect, you can either open up a new terminal or reload your ~/.bashrc file:
효과를 발생하게 하기 위해서 ~/.bashrc 파일을 리로드해줍니다.
Finally, let’s create our cv virtual environment where we’ll be doing our computer vision development using OpenCV 3.0 and Python 3.4:
그 다음으로는 컴퓨터에서 OpenCV 를 사용할 수 있게 cv 를 생성해줍니다.
1 | $ mkvirtualenv cv |
Step 3: Build and install OpenCV 3.0 with Python 3.4+ bindings
Alright, our system is all setup now! Let’s pull down OpenCV from GitHub and checkout the3.0.0 version:
OpenCV 를 깃 허브에서 3.0 버전을 다운로드 합니다.
Update (3 January 2016): You can replace the 3.0.0 version with whatever the current release is (as of right now, it’s 3.1.0 ). Be sure to check OpenCV.org for information on the latest release.
We’ll also need to grab the opencv_contrib repo as well (for more information as to why we need opencv_contrib , take a look at my previous OpenCV 3.0 Ubuntu install post): grab 을 github 에서 받아줍니다.
Again, make sure that you checkout the same version for opencv_contrib that you did foropencv above, otherwise you could run into compilation errors.
Time to setup the build: opencv_contrib 와 opencv 가 같은 버전인지 확인합니다. 그렇지 않으면 에러가 발생합니다.
여기에서는 생략 된 과정이 있는데, 저는 결과를 봐도 동일하지 않아서 생략했습니다.
Speaking of compiling, let’s go ahead and kickoff the OpenCV compile process:
Where the 4 can be replaced with the number of available cores on your processor to speedup the compilation time.
Assuming OpenCV 3.0 compiled without error, you can now install it on your system:
1 2 | $ sudo make install $ sudo ldconfig |
위의 명령어로 설치를 진행해줍니다.
/usr/local/lib/python3.4/site-packages/
이제 위의 경로로 설치가 됩니다.
저 같은 경우에는 usr/local/lib/python2.7/site-packages 에 설치가 되어있습니다.
자신이 설치한 버전과 동일한 디렉토리로 가서 파일을 확인해서 진행하셔야합니다.
However, in order to use OpenCV 3.0 within our cv virtual environment, we first need to sym-link OpenCV into the site-packages directory of the cv environment, like this:
cv 환경에서 OpenCV 3.0 을 사용하려면 symbolic link 를 생성해 주어야 하기 때문에 아래의 명령어를 입력합니다.
저 같은 경우에는 저 3.4 의 숫자가 2.7로 바뀌었습니다.
Notice how I am changing the name from cv2.cpython-34m.so to cv2.so — this is so Python can import our OpenCV bindings using the name cv2 .
So now when you list the contents of the cv virtual environment’s site-packages directory, you’ll see our OpenCV 3.0 bindings (the cv2.so file):
Step 5: Test out the OpenCV 3.0 and Python 3.4+ install
Nice work! You have successfully installed OpenCV 3.0 with Python 3.4+ bindings (and virtual environment support) on your Ubuntu system!
But before we break out the champagne and beers, let’s confirm the installation has worked. First, ensure you are in the cv virtual environment, then fire up Python 3 and try to importcv2 :
1 2 3 4 5 | $ workon cv $ python >>> import cv2 >>> cv2.__version__ '3.0.0' |
위의 명령어를 입력해주면 작동이 되야합니다.
저 같은 경우는 잘 안되서
sudo apt-get update
같은 명령어를 다시 입력했구요.
이것 저것 많이 해보다가 Jupyter Notebook 환경에서 python2 에서만 작동하게 되었습니다.
위의 명령어 import cv2 를 입력해도 오류가 없으면 이상이 없습니다.
>> 예제 입력
설치가 끝났으니 예제를 진행해보겠습니다.
예제는 인터넷에 있는 수 많은 예제를 찾아보았는데 작동을 잘 하지 않더라구요.
그래서 겨우 찾아서 해결을 했습니다.
1 2 3 4 5 6 7 8 9 10 11 12 13 14 15 16 17 18 19 20 21 22 | import numpy as np import cv2 faceCascade = cv2.CascadeClassifier('haarcascades/haarcascade_frontalface_default.xml') image = cv2.imread('redVelbet.jpg') gray = cv2.cvtColor(image, cv2.COLOR_BGR2GRAY) faces = faceCascade.detectMultiScale( gray, scaleFactor=1.1, minNeighbors=5, minSize=(30, 30), flags = cv2.cv.CV_HAAR_SCALE_IMAGE ) print "Found {0} faces!".format(len(faces)) for (x, y, w, h) in faces: cv2.rectangle(image, (x, y), (x+w, y+h), (0, 255, 0), 2) cv2.imshow("Faces found", image) cv2.waitKey(0) cv2.destroyAllWindows() cv2.waitKey(1) | cs |
소스 코드는 위와 같습니다.
haarcascades 파일을 다운로드 하기 위해서는 아래의 링크를 참조하시면 됩니다.
https://github.com/opencv/opencv/tree/master/data/haarcascades
사실 이전에 다운로드 했던 ~/opencv/data 에 이 파일이 포함되어있습니다.
이미지는 레드벨벳의 사진으로 해 보았습니다.
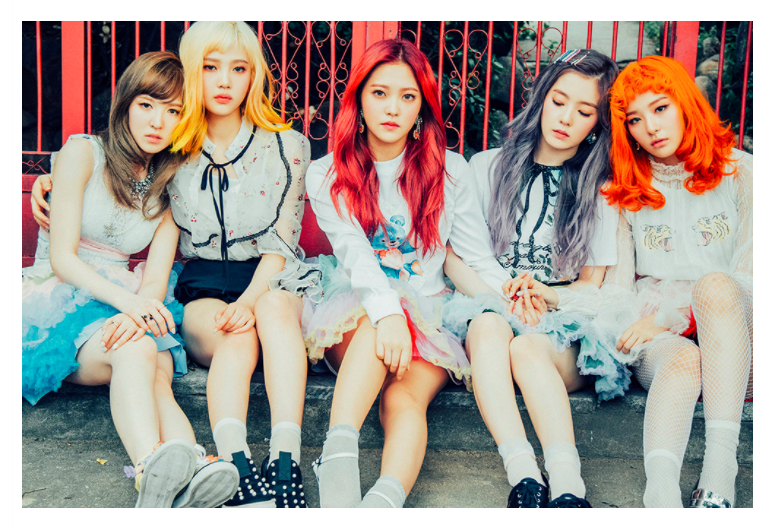
위와 같은 사진이구요
http://img.tenasia.hankyung.com/webwp_kr/wp-content/uploads/2016/09/2016090911081720022.jpg
이미지 링크는 위와 같습니다.
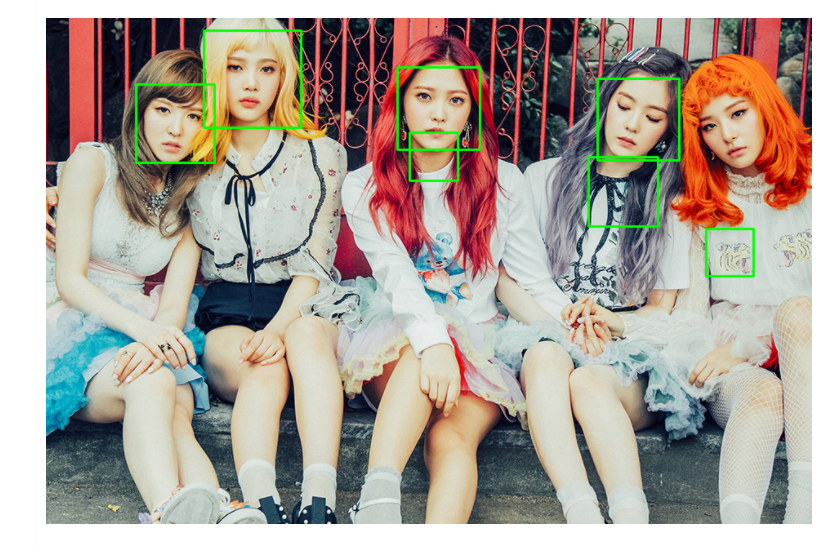
위와 같이 인식을 하는데요.
인식률이 그렇게 높지는 않은 것 같습니다.
위 코드에서 문제는 창이 안 닫히는 문제가 있습니다.
cv2.imwrite('redVelbet_change.png',img)
그 때는 위와 같은 코드를 입력해서 이미지를 저장해 주면 됩니다.