node js 에서 오라클을 사용하는 과정은 상당히 까다로웠다.
설치하는 방법은 아래와 같다.
여러 가지 시행 착오 끝에, 서로 다른 서버에 설치된 db와 리눅스를 연결하는 데 성공했다.
먼저, oracledb 모듈을 아래의 명령어로 설치한다.
npm install oracledb
dbconfig.js 파일을 생성하고 디비 정보를 입력한다.
// dbconfig.js


module.exports = {
    user          : process.env.NODE_ORACLEDB_USER || "계정아이디",

    // Instead of hard coding the password, consider prompting for it,
    // passing it in an environment variable via process.env, or using
    // External Authentication.
    password      : process.env.NODE_ORACLEDB_PASSWORD || "비밀번호",

    // For information on connection strings see:
    // https://github.com/oracle/node-oracledb/blob/master/doc/api.md#connectionstrings
    connectString : process.env.NODE_ORACLEDB_CONNECTIONSTRING || "호스트이름/자신의 sid",


    // Setting externalAuth is optional.  It defaults to false.  See:
    // https://github.com/oracle/node-oracledb/blob/master/doc/api.md#extauth
    externalAuth  : process.env.NODE_ORACLEDB_EXTERNALAUTH ? true : false
};
메인 js 파일에서 아래의 소스코드를 추가한다.
execute 부분을 변경하면 원하는 쿼리문을 호출할 수 있다.
var oracledb = require('oracledb');
var dbConfig = require('./dbconfig.js');

oracledb.getConnection(
    {
        user          : dbConfig.user,
        password      : dbConfig.password,
        connectString : dbConfig.connectString
    },
    function(err, connection)
    {
        if (err) {
            console.error(err.message);
            return;
        }
        connection.execute(
            "SELECT * FROM TEST",
            function(err, result)
            {
                if (err) {
                    console.error(err.message);
                    doRelease(connection);
                    return;
                }
                console.log(result.metaData);
                console.log(result.rows);
                doRelease(connection);
            });
    });

function doRelease(connection)
{
    connection.release(
        function(err) {
            if (err) {
                console.error(err.message);
            }
        });
}
설치 후 서버를 실행하니, 아래와 같은 에러가 발생했다.
/home/ubuntu/movie_project/node_modules/oracledb/lib/oracledb.js:65
throw new Error(nodbUtil.getErrorMessage('NJS-045', nodeInfo));
^
Error: NJS-045: cannot load the oracledb add-on binary for Node.js 8.11.1 (linux, x64)
Node.js require() error was:
DPI-1047: 64-bit Oracle Client library cannot be loaded: "libclntsh.so: cannot open shared object file: No such file or directory". See https://oracle.github.io/odpi/doc/installation.html#linux for help
Node.js require() mapped to /home/ubuntu/movie_project/node_modules/oracledb/build/Release/oracledb.node
Node-oracledb installation instructions: https://oracle.github.io/node-oracledb/INSTALL.html
You must have 64-bit Oracle client libraries in LD_LIBRARY_PATH, or configured with ldconfig.
If you do not have Oracle Database on this computer, then install the Instant Client Basic or Basic Light package from
http://www.oracle.com/technetwork/topics/linuxx86-64soft-092277.html
at Object.<anonymous> (/home/ubuntu/movie_project/node_modules/oracledb/lib/oracledb.js:65:13)
at Module._compile (module.js:652:30)
at Object.Module._extensions..js (module.js:663:10)
at Module.load (module.js:565:32)
at tryModuleLoad (module.js:505:12)
at Function.Module._load (module.js:497:3)
at Module.require (module.js:596:17)
at require (internal/module.js:11:18)
at Object.<anonymous> (/home/ubuntu/movie_project/node_modules/oracledb/index.js:1:80)
접속 에러의 이유는 Node.js와 오라클 Server간의 연결해주는 인터페이스가 없기 때문이다.
따라서, 오라클 클라이언트를 다운로드 해주어야 한다.
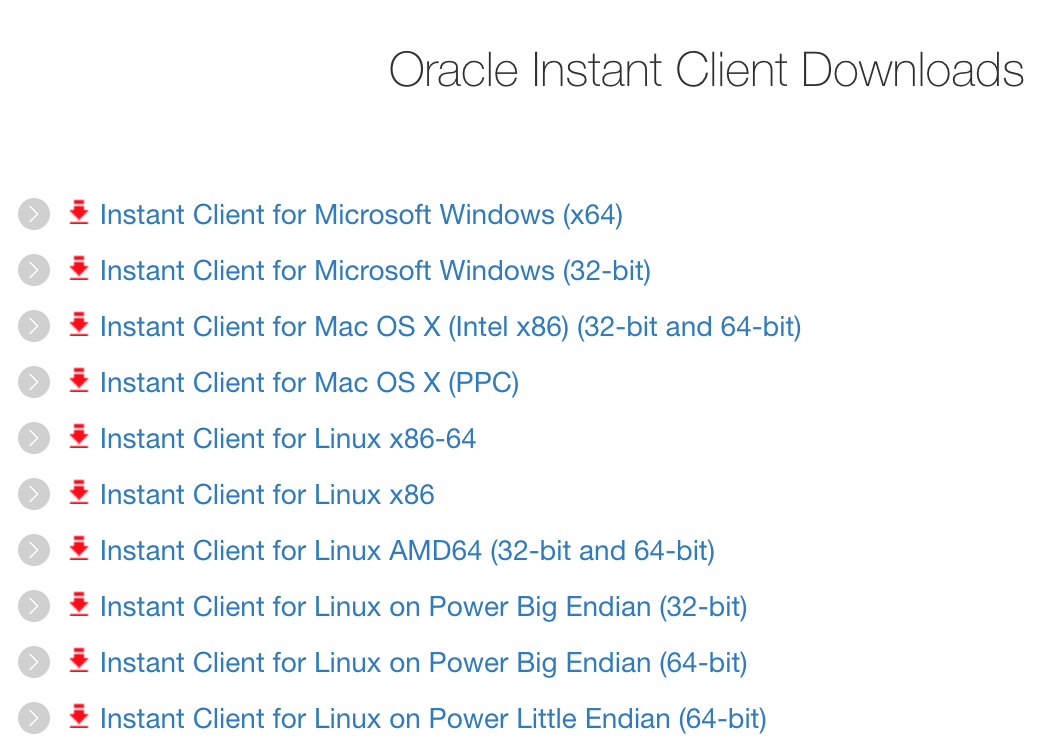
아래의 링크를 통하여 원하는 운영체제를 선택 후에 파일을 설치한다.

http://www.oracle.com/technetwork/database/database-technologies/instant-client/downloads/index.html
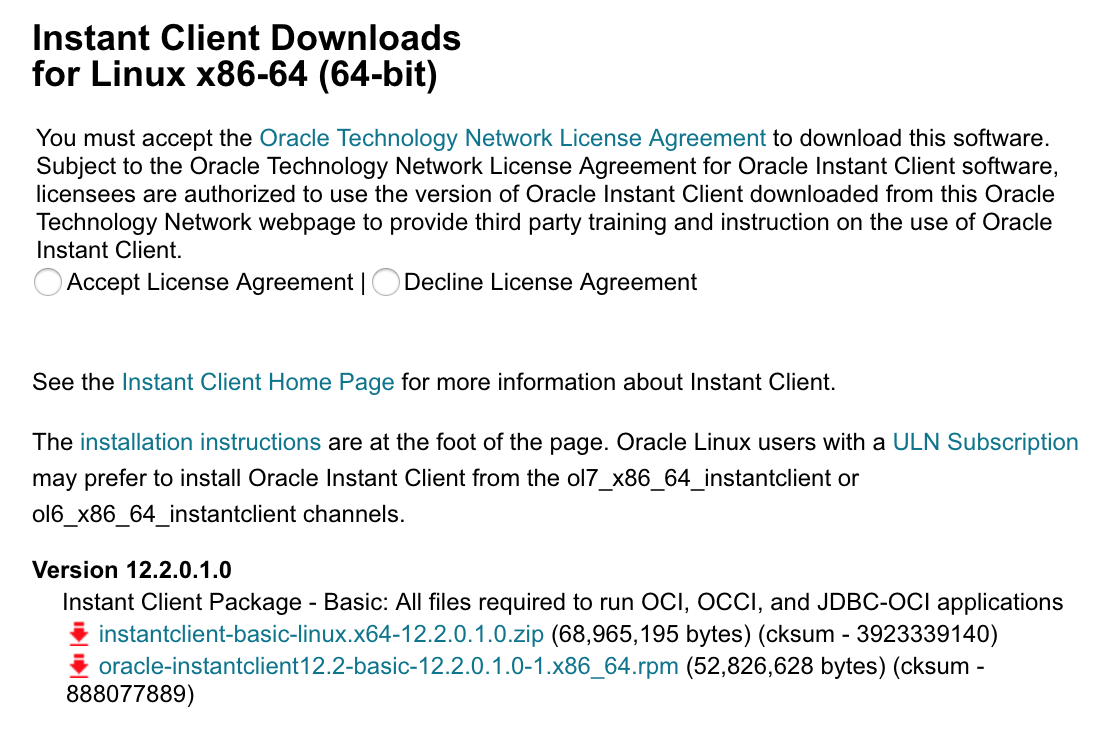
나는 Linux 64비트 이기 때문에 5번 째에 있는 Linux x86-64를 선택했다.

http://www.oracle.com/technetwork/topics/linuxx86-64soft-092277.html
다음으로는 약관에 동의를 한 다음에 zip 파일과 rpm 파일을 모두 다운로드 받는다.
나는 리눅스를 사용하기 때문에, scp 명령어를 통하여 파일을 전송했다. (사용하는 리눅스는 gui 지원을 안해서 )
scp 파일 전송 링크 : https://www.yongbok.net/blog/%EB%A6%AC%EB%88%85%EC%8A%A4-ssh-%ED%8C%8C%EC%9D%BC-%EC%A0%84%EC%86%A1-scp/

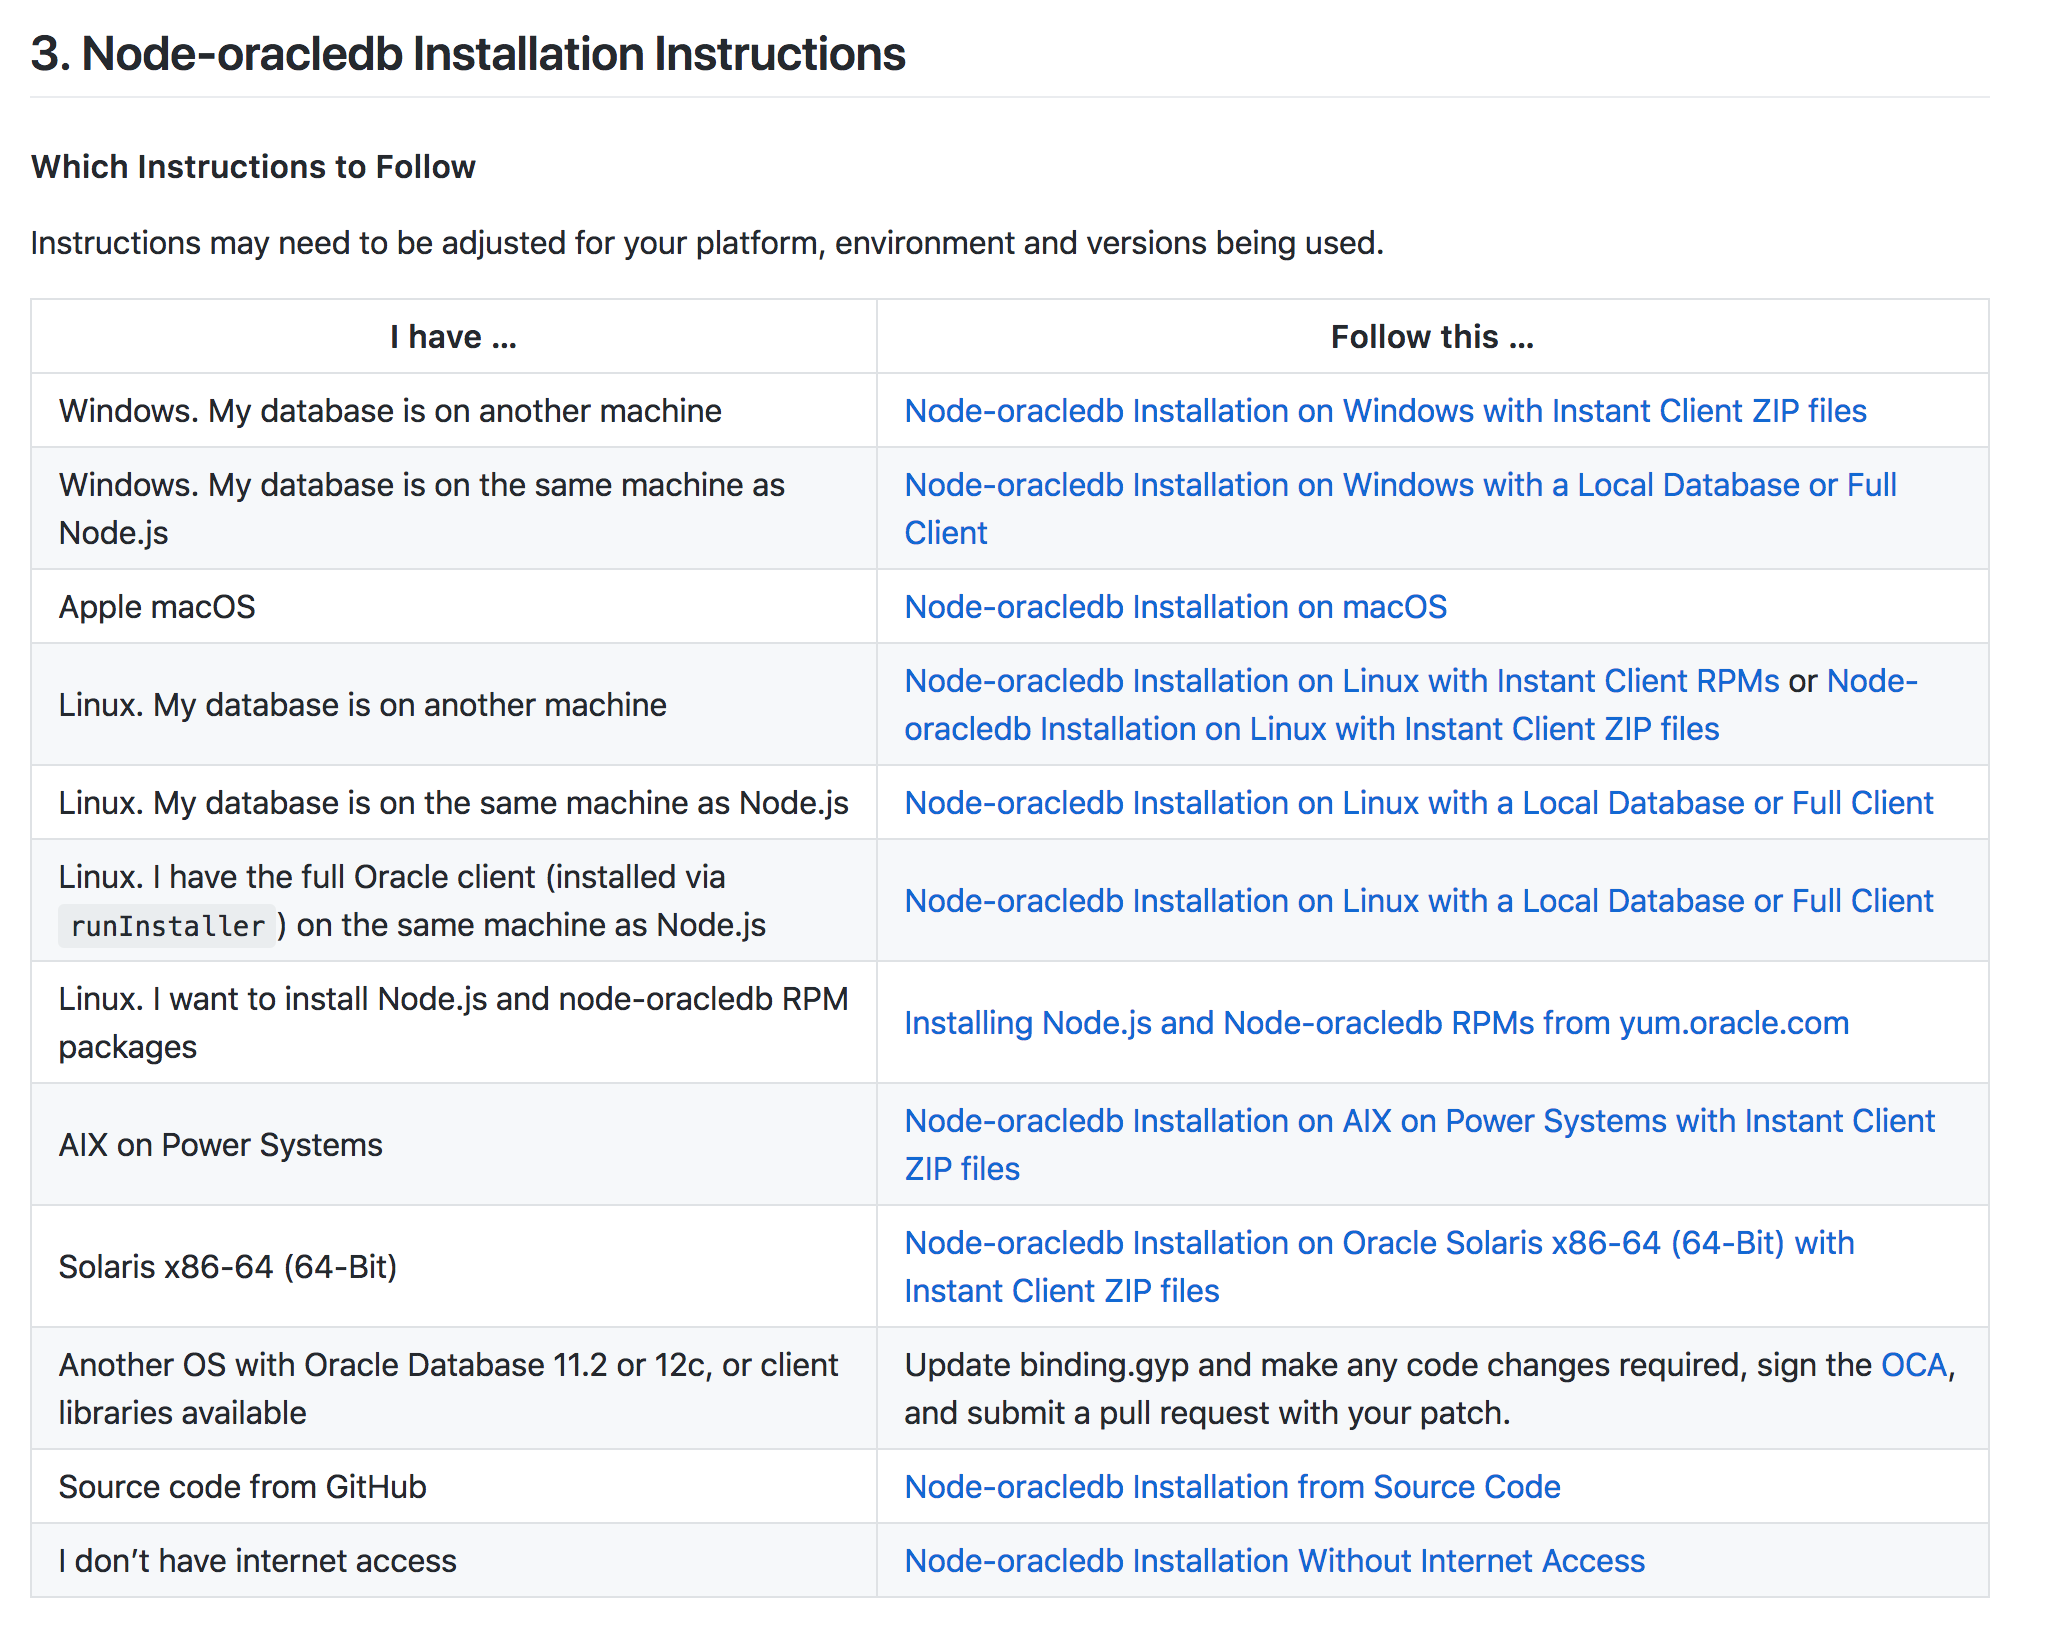
https://oracle.github.io/node-oracledb/INSTALL.html
다음으로는 위의 링크에 들어가서, 원하는 조건의 시스템을 설치해준다.
나는 Linux. My database is on another machine 이기 때문에 (디비와 웹서버의 분리), 해당 링크 2개를 각각 클릭해서 과정을 수행했다.
https://oracle.github.io/node-oracledb/INSTALL.html#instrpm
https://oracle.github.io/node-oracledb/INSTALL.html#instzip
각각은 rmp 파일과 zip 파일을 설치하는 과정을 설명해준다.
nodejs의 설치 과정은 무시했다.
** rpm 설치하기
sudo yum install oracle-instantclient12.2-basic-12.2.0.1.0-1.x86_64.rpm(예시 바꿔야 함 !! )위의 명령어를 입력해서 설치한 oracle rpm 파일로 파일 명을 수정하고 실행해준다.
다음으로는 아래의 명령어들을 순차적으로 실행한다.
sudo sh -c "echo /usr/lib/oracle/12.2/client64/lib > /etc/ld.so.conf.d/oracle-instantclient.conf"
sudo ldconfig
export LD_LIBRARY_PATH=/usr/lib/oracle/12.2/client64/libsudo mkdir -p /usr/lib/oracle/12.2/client64/lib/network/admin
** Zip파일 설치하기
unzip instantclient-basic-linux.x64-12.2.0.1.0.zip(설치한 zip파일 명으로 변경)
mkdir -p /opt/oracle
mv instantclient_12_2 /opt/oracle
위의 명령어를 입력하여 압축을 풀어준 다음 파일을 옮긴다.
그리고 아래의 명령어들을 순차적으로 입력한다.
sudo sh -c "echo /opt/oracle/instantclient_12_2 > /etc/ld.so.conf.d/oracle-instantclient.conf"
sudo ldconfig
export LD_LIBRARY_PATH=/opt/oracle/instantclient_12_2:$LD_LIBRARY_PATH
sudo mkdir -p /opt/oracle/instantclient_12_2/network/admin그리고 서버를 실행하면 아래와 같은 결과가 나오게 된다.
ubuntu:~/$ node server.js
Express server has started on port 80
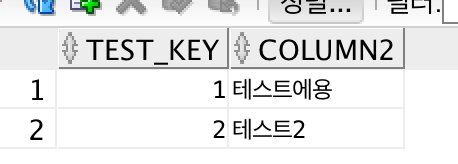
[ { name: 'TEST_KEY' }, { name: 'COLUMN2' } ]
[ [ 1, '테스트에용' ], [ 2, '테스트2' ] ]

실제 DB의 정보이다.
- 출처 -
http://slurpuff.tistory.com/3
https://m.blog.naver.com/PostView.nhn?blogId=scw0531&logNo=221169287236&targetKeyword=&targetRecommendationCode=1&proxyReferer=https%3A%2F%2Fwww.google.co.kr%2F
https://oracle.github.io/node-oracledb/INSTALL.html